
How to register and update Foxwell NT650 service reset tool and OBD2 code scanner in step by step procedure, incl. words & images as well as YouTube video.
Procedure:
Plug the USB cable into the Foxwell NT650 and another end to the computer.
The machine turn on and have menu options (OBDII and 12 types of service reset functions).


Choose "Application /setup", then "About", you can check the machine serial number, take a picture of it.
 7
7

Unplug the USB cable, take off the SD card, plug the SD card into the card reader.
Plug the card reader into the computer.


Browse the www.foxwelltech.com.
Click on "Product", then "Foxwell NT650", then "Download", then install "Foxscanner Installer _8.71_20190124.zip".


Begin to install " Foxscanner Installer" until it finishes.


Open Foxscanner 8.71 and then register until it prompts registration is done, don't forget to confirm your email address in your email.


Next is to update Foxwell NT650.
Login Foxscanner 8.71 with your name and password.
Get message "No serial number associated with the user", then choose "Register Products", then input the Serial Number" and password, summit and get message "Serial Numbers registered successfully".


Back to "My updates" and you can see the available updates.
You can choose all models or one simple model to update.


Youtube video:
[embed]https://www.youtube.com/embed/goBBoFNFjiI[/embed]
how to Register and Update Foxwell NT650 service reset tool & OBD2 code reader.
That's all.
Thanks
Porsche Cayenne has Airbag light on, I will use Foxwell NT650 to see what's going wrong with the airbag light on and try to reset it, the job is done perfectly. Next is to perform Steering Angle sensor (SAS) Calibration" with Foxwell NT650


Select "ABS /SRS".

European.

Porsche.
Loading data, please wait


For this one, it only gives "Manual selection". So we have:
Cayenne (9PA up to MY 2010)
Cayenne (92A from MY 2011)
Boxster (987)
Cayma/ Boxster (986)
Boxster /Cayman (981)
Cayman (987)
911 (997)
911 (996)
The first one " Cayenne (9PA up to MY 2010)" is what I need.


Diagnosis -> Control units -> Airbag ->Mode Menu.


We are going to read codes, let's see what's wrong with it, that's two codes:
1316: PSM control module
2511: AWS control module


We are going to go back and select "Control Units", and then "PSM", and if we can check this code as well, and get "DTC : 778 Steering angle sensor"


Next is perform "Steering Angle sensor (SAS) Calibration" with Foxwell NT650.
Choose the vehicle
Europe.
Go to "Porsche".
Cayenne (Up to 2010)
Switch on ignition.
Steering Angle Sensor calibration "Info, Important, Safety note"
Calibration Succeed.


Finally, the ABS and SRS light go away.

This post gives brief instructions of the most commonly required service and maintenance operations in Foxwell NT650. Typical service operation screens are a series of menu driven executive commands. Follow on-screen instructions to complete the operation.
Available service and maintenance options include:
Oil Service Reset
Electronic Parking Brake (EPB)
Battery Replacement (BRT)
DPF Regeneration
Throttle Body Alignment (TBA/TPS)
Steering Angle Sensor (SAS) Calibration
Tire Pressure Monitoring System (TPMS) Programming
Gear Learning
CVT
ODOMETER
INJECTOR CODING

Oil Light Reset menu allows you to reset the service lamps on the instrument cluster. The
Service Indicator System is designed to alert the driver when the vehicle is due for a service.
Oil service reset methods are determined by the vehicle being tested. Depending on the vehicle being tested, any of the following means displays:
Oil Reset With One Button
Manual Reset
Auto Reset
1.1 Oil Reset With One Button
Oil Reset With One Button is applicable to GM models only. It offers quick and simple oil service reset with the click of one button.
To do Oil Reset With One Button:
1). Scroll with up and down arrow keys to highlight Oil Reset With One Button from the Oil Reset menu. An Information screen displays. Press the function key OK to continue or Cancel key to return to the Oil Reset menu.

2). Follow on-screen instruction and send a command to reset oil service. A screen with Success”
message displays once the lamp has been reset. Press any key to return.

3). If the oil service reset failed, the following screen displays. Please follow on-screen instructions to troubleshoot it. If the problem still exists, please contact your local dealer for assistant.

1.2 Manual Reset
Almost all Asian vehicles and most American and European vehicles have mechanical oil service indicator reset. The service tool does not have to communicate with the vehicle being tested, but guides you to complete the service manually by providing step-by-step on-screen instructions.
When Manual Reset is selected and the vehicle being tested identified, a procedure opens on the screen. Scroll with arrow keys to read the entire procedure and performing the necessary steps as directed by the on-screen instructions. The exact order of the test operation steps may vary depending on the test vehicle. Be sure to follow all on-screen instructions.
This manual reset procedure can be interrupted and aborted if the ignition key position is changed.
To do oil reset manually:


1.3. Auto Reset
Auto Reset is a bi-directional communication procedure directed by the service tool. The service tool displays guides for you through the process. A number of instructions that require a response to continue display, including an option to clear any stored codes once the interval has been reset. Follow the on-screen instructions.
EPB Service menu allows you to perform the service and maintenance of brake systems, including deactivation and activation of the brake control system, bleeding brake fluid, opening and closing brake pads, and setting brakes after disc or pad replacement, on multiple brands of vehicles where electronic brake systems are fitted.
Some tests display a command to the operator. For example, if Pressing Brake Pedal” displays, the operator has to press and hold the brake pedal and then continue. Actual tests vary by vehicle manufacturer, year, make.
Typical special test options include:
Deactivate/Activate SBC/EPB systems -allows to deactivate brakes for further service or maintenance work on brake systems or activate brakes when service or maintenance work on brake systems are completed.
Adaptation on Audi A8 -allows to set new pad thickness of rear brakes calipers after changing brake discs & pads on Audi A8 models.
Replace hydraulic brake systems fluid/bleedbrake system on MercedesSBC vehicles allows to change brake fluid/bleed brake system.
Perform service reset and service position on BMW EPB vehicles -allows to do the CBS reset and CBS correction for front brake and rear brake.
Perform activation/service work on Volvo PBM vehicles -allows to perform installation check, applying parking brake, releasing parking brake, activating service mode and exiting service mode.
Reset memory on Toyota EPB vehicles -allows to clear the learned memory of the EPB ECU.
Perform brake cable replacement and electric parking brake replacement -allows to fit in or remove the brake cable safely, adjust brake cable’s tension and calibrate the electric parking brake replacement.
Save and write clutch pedal programming on Renault EPB vehicles -allows to save clutch pedal programming on Renault vehicles fitted with manual gearbox. After this command is activated, the tool allows to "flash" the electric parking brake unit with the saved clutch data.
Perform control function and reset function on Opel EPB vehicles -allows to apply/release park brake cable service, provide park brake cable service replacement procedures and calibrate the parking brake systems after brake service.
Sensor calibration on Honda EPB vehicles -allows to program the current output value of each sensor into the electric parking brake unit.
Provides parking brake unjam procedure and perform longitudinal accelerometer calibration on Land Rover EPB vehicles -allows to drive the electronic park brake so it is unjamed in the releasing direction and then drive it into mounting position or the latching position; also allows to perform longitudinal accelerometer calibration.
Warning:
EPB systems must be deactivated before carrying out any maintenance/service work on the brakes such as changing of pads, discs and calipers.
Use proper tools to avoid the risk of body injuries of mechanics and technicians and damage to the brake system.
Make sure the vehicle is properly blocked after deactivation of the systems.
BRT menu lets you to new battery validated, how to clear faults from the dashboard and display current battery details of the vehicle such as Audi, BMW, Citroen, Peugeot, Seat, Skoda, Volvo, VW, Ford,Infiniti,Jaguar, Land Rover, Lexus,Mini, Mitsubishi,Nissan, Holden, Hyundai, Mzda, Opel, Porsche, Renault, Toyota.
DPF Regeneration menu let you perform the DPF cleaning to clear the blockage through continuous burning of the particulates captured in the DPF filter. When a DPF regeneration cycle is completed, the DPF light automatically goes off.
It’s very common to see a customer pull into the shop with a Volkswagen or Audi that just will not idle correctly. One of the possible causes is that the throttle position is not known. When the motion range is not known, the ECU simply has no idea where to set the throttle. The ECU must know the full range of motion of the throttle in order for it to properly control the engine. Using the throttle position sensors in the throttle body, the ECU learns the full open and full closed positions through various states (idle, part throttle, WOT) known as a Throttle Body Alignment (TBA).
SAS Calibration menu let you perform calibration of the Steering Angle Sensor, which permanently stores the current steering wheel position as straight-ahead in the sensor EEPROM. On successful calibration of the sensor, its fault memory is automatically cleared.
TPMS Service menu allows you to check the tire sensor IDs from the vehicle ECU and to perform TPMS programming and reset after tires and/or TPM sensors are replaced and/or tires are rotated.
1.Crankshaft position sensor adaptive learning. The crankshaft position sensor learns crankshaft tooth machining tolerance and save to the computer to more accurately diagnose engine misfires. If tooth learning is not performed for a car equipped with Delphi engine, the MIL turns on after the engine is started. The diagnostic device detects the DTC P 1336 'tooth not learned'. In this case, you must the diagnostic device to perform tooth learning for the car. After tooth learning is successful, the MIL turns off. 2.After the engine ECU, crankshaft position sensor, or crankshaft fly wheel is replaced, or the DTC 'tooth not learned' is present, tooth learning must be performed
This function is used to reset the compensation code and initialize the ECT after a solenoid valve or valve body assembly has been replaced.
This function allows you to revise the date of odometer and write the original date into new odometer.
This function is to reset and match the date after injector is replaced.
Foxwell NT650 source:
http://www.foxwelltool.com/wholesale/nt650-automotive-service-reset-scan-tool-obd2-code-reader.html
JMD Super-remote, available in mid-March 2019, comes with three types of remote control: DS, Ford and Buick Oncora. Super remote control is a combination of chip and remote control, including chip and remote control functions. Super-remote control generate electronic sub computers in Handy-baby II.
So, what questions do you have about this Super-remote? this post answers 10 questions that customers may ask.
Question 1: When does Super-remote come on the market?
Answer: Super-Remote control will be available at the end of March 2019 and can be purchased by contacting agents.
Question 2: How much is the Super-remote pricing?
Answer: No pricing.
Question 3:How many models and functions of remote control are there?
Answer: Now there are three types of remote control: DS, Ford and Buick Encore.
The three styles have different shapes and the same functions.

Question 4:What are the Super-remote supported Vehicles?
The type of chip supported by Super remote is the same as that of Super chip.
Including 4D/46/47/48/T5 chip types.
Specific support for remote control models can be seen in mobile phone APP 【Remote】-【JMD Remote】【JMD ELE-Remote】


Question 5:Does the Super-remote control contain chips?
Answer: Super remote control is a combination of chip and remote control, including chip and remote control functions.
Question 6: How does Super-remote control generate electronic subcomputers?
Answer: Electronic subcomputers can be directly generated in Handy-baby Ⅱ.
——Handybaby Ⅱ【chip-fun】
——【Remote Transfer】
——Choosing the Corresponding Vehicle Type
——Analog key for Handy-Baby Ⅱ antenna
——Matching with equipment on board
——When the matching is successful, the super remote control is put into the coil to generate the remote control.
Question 7: Is Super-remote control wired or wireless?
Answer: Super-remote supports both wired and wireless burning.
After selecting the corresponding model, APP will prompt you to choose the burning mode.
(Some models only support wired connections.)
Question 8: How does the Super-remote control generate the corresponding remote ?
Answer: Cooperate with Handy-baby II and APP to generate remote control.
——APP【Remote】
——【JMD Remote】
——Choosing the Corresponding Vehicle Type
——Choose the generation mode
——1. Connect Handy-baby II generation (wired)


——2.Remote Placement in Handy-baby II Recognition Coil Generation (Wireless)


Question 9: How to match the Super-remote copy to get on the car?
Answer: Super remote control matching methods include manual matching and equipment matching.

Matching remote control or all loss with JMD OBD.
Question 10 : Does JMD have ordinary remote control?
Answer: Super-remote control can be used as ordinary remote control. Ordinary remote control is planned.
Suggested feedback
Suggestions and Suggestions in the Use of Super Remote Control. Please give positive and timely feedback.

Here shows how to use Foxwell i70pro & Foxwell i70 to diagnose Mercedes Benz models in step by step.
FYI, Foxwell i70pro & Foxwell i70 have the same operation interface.
This is the main menu.


Tap "Diagnostic" and you can see the vehicle coverage incl. America, Asia, Europe, China etc.
Under "Europe" and you will see "Benz".


Benz -> car model -> E(211)-> up to 05/2005-> Left-hand steering-> Sedan-> 211.087 E 350 4Matic -> 211.070 main groups-> 211.070 Control unit groups -> 211.070 Drive -> Function Menu-> ECU information-> Read codes- Erase codes.


Actual values -> Check engine at cold start and in warming-up phase.


Active test.


Special function - Correction programming.


FYI, before updating Foxwell i70pro or Foxwell i70, you need to register and log in.

That's all.
Thanks
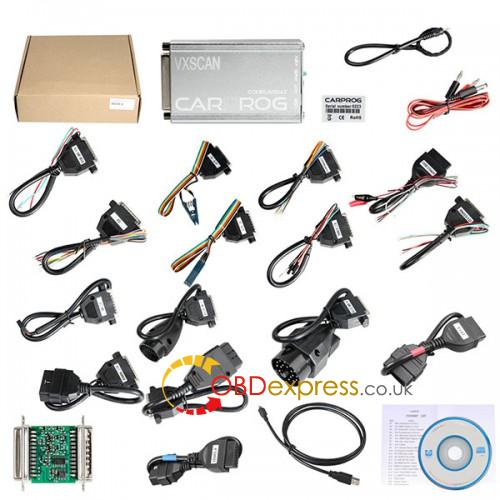
obdexpress.co.uk مهندس ارائه می دهد از لینک مگا رایگان نرم افزار CARPROG 9.31 و 10.93. و همچنین راهنمای نصب و گزارش تست.
نرم افزار CARPROG 9.31 دانلود رایگان:
https://mega.nz/#!oQRyiYwS!nYR2BGzKesgz0spuRYfr5wQFSABLpCO8v7zB7rhXbrY
NO PASS
نرم افزار CARPROG 10.93 دانلود رایگان:
https://mega.nz/#!pIggmQ7C!K0TwZSL23IDEqRCjBB8Qvg3BfQzQ95hulJXTqdLffcU
NO PASS
هر دو 9.31 و 10.93 سازگار با CARPROG سیستم عامل 8.21 رابط .
راهنمای نصب:
چگونه به نصب CARPROG V10.93 به Win 7؟
چگونه به نصب CARPROG V10.05 به Win 7؟
چگونه به نصب نرم افزار CARPROG v8.21 کامل
CARPROG کلون بررسی:
همه چیز درباره کلون CARPROG
https://mhhauto.com/Thread-All-About-Carprog-Clone؟page=6&highlight=carprog
درباره نتایج آزمون، و همچنین پرسش و پاسخ.
ahttp://blog.obdexpress.co.uk/2019/03/29/free-download-carprog-fw-8-21-sw-9-31-10-93/
اولین بار که کاربر نصب FGTech Galletto 2 V54 0475 ، او مشکل زیر مواجه می شوند.
این نرم افزار قابل تأیید نیست! این نرم افزار ممکن است کار نمی کند.
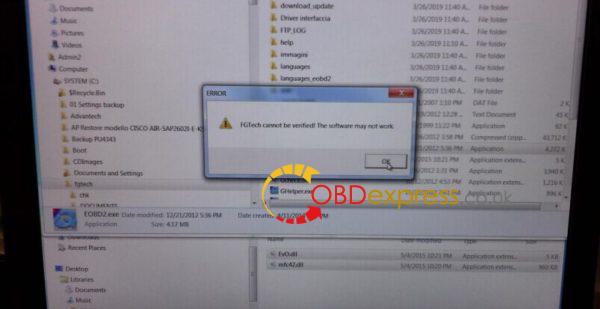
سپس، او با پیروی از این فیلم مسافرت:
کردم و خطای جدید " FGT2XX.dll" نمی توانید پیدا کنید " ، لطفا دوباره نصب این برنامه".
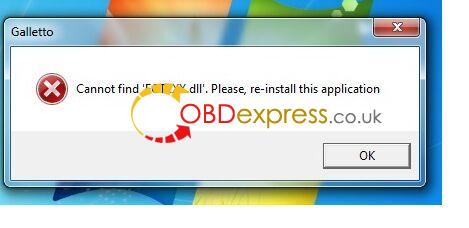
دلایل احتمالی و راه حل های obdexpress.co.uk enginner :
برخی از فایلها از دست داد.
لطفا FGTech V54 اتصال به کامپیوتر و ماشین، و سپس تکمیل نصب درایور، نصب مجدد نرم افزار Galletto.
در اینجا من ترک یک ایمیل Sales@OBDexpress.co.uk در مورد هر کسی نیاز دستیار از راه دور.
http://blog.obdexpress.co.uk/2019/04/04/solution-to-fgtech-v54-0475-cant-find-fgt2xx-dll/
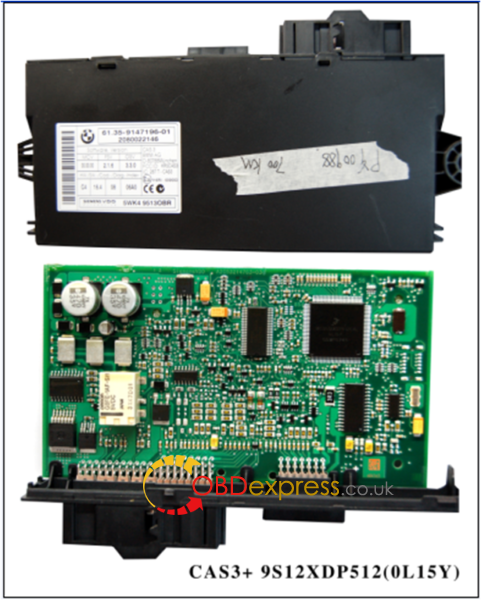
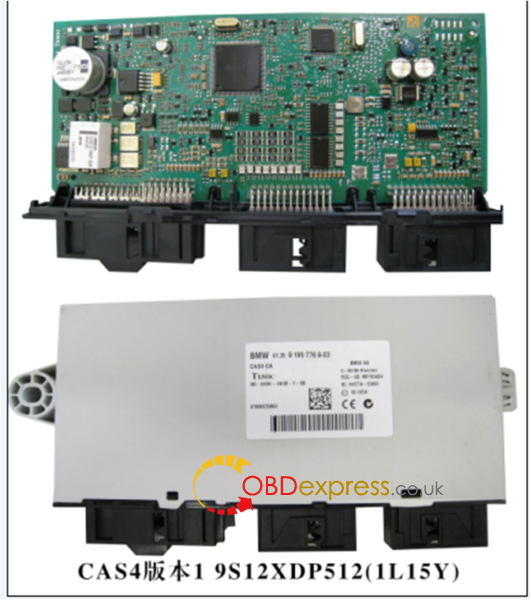
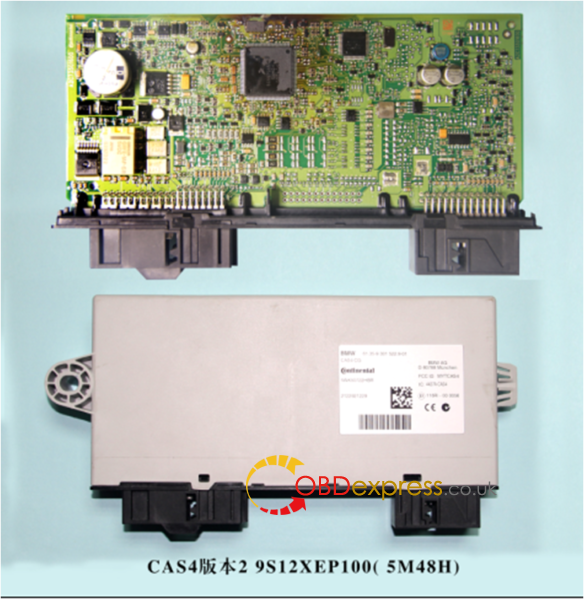
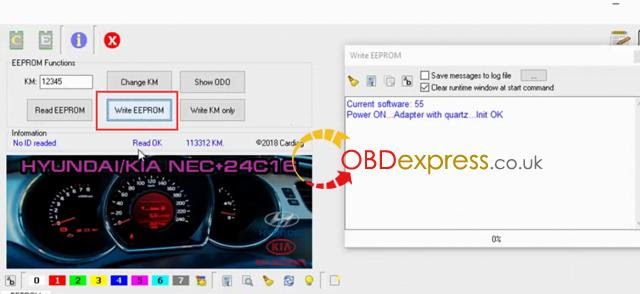
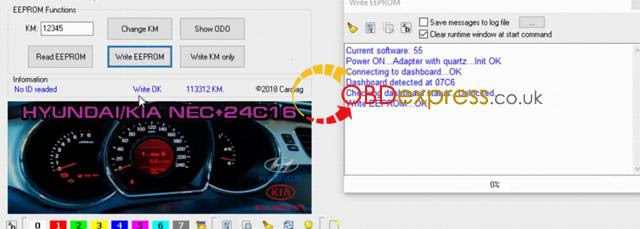
Yanhua کوتاه ACDP BMW CAS1 CAS2 CAS3 CAS3 + CAS4 CAS4 +، FEM / BDC، BDC2 تحت پوشش (2000-2019).کوتاه ACDP است کیلومترشمار اصلاح و قابلیت های کلیدی برنامه نویسی.
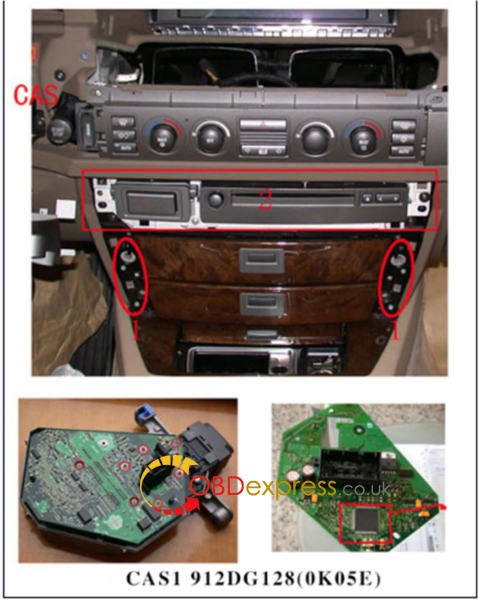
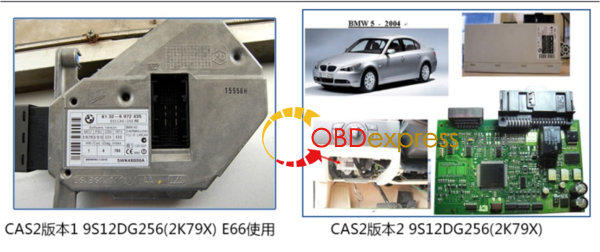
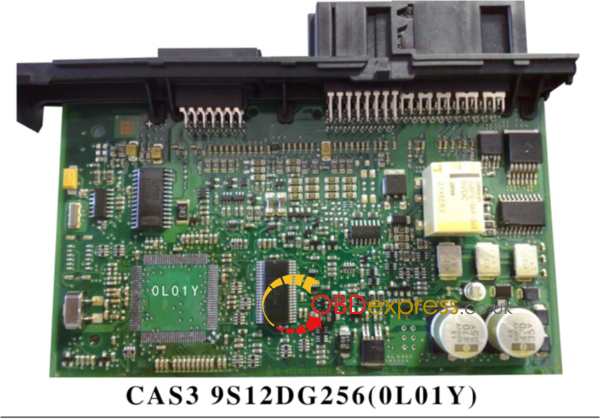
در اینجا می آید یک جدول از پوشش Yanhua کوتاه ACDP BMW:
من 2 تصاویر از جدول بالا گرفت، شما می توانید با کلیک بر روی آنها را بزرگ کنید.
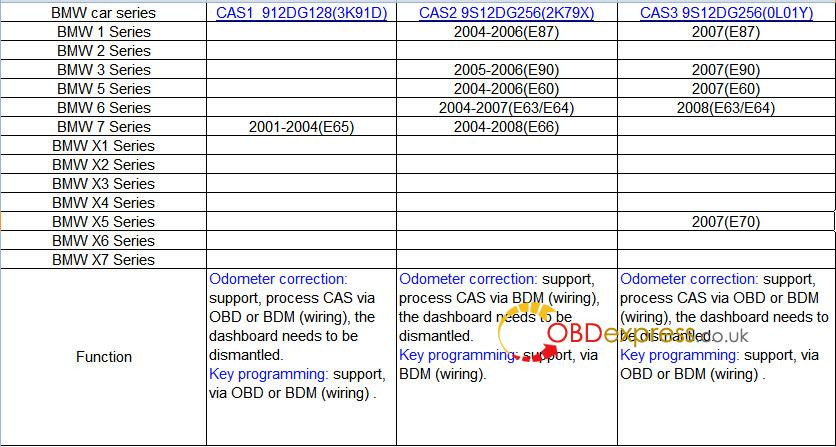
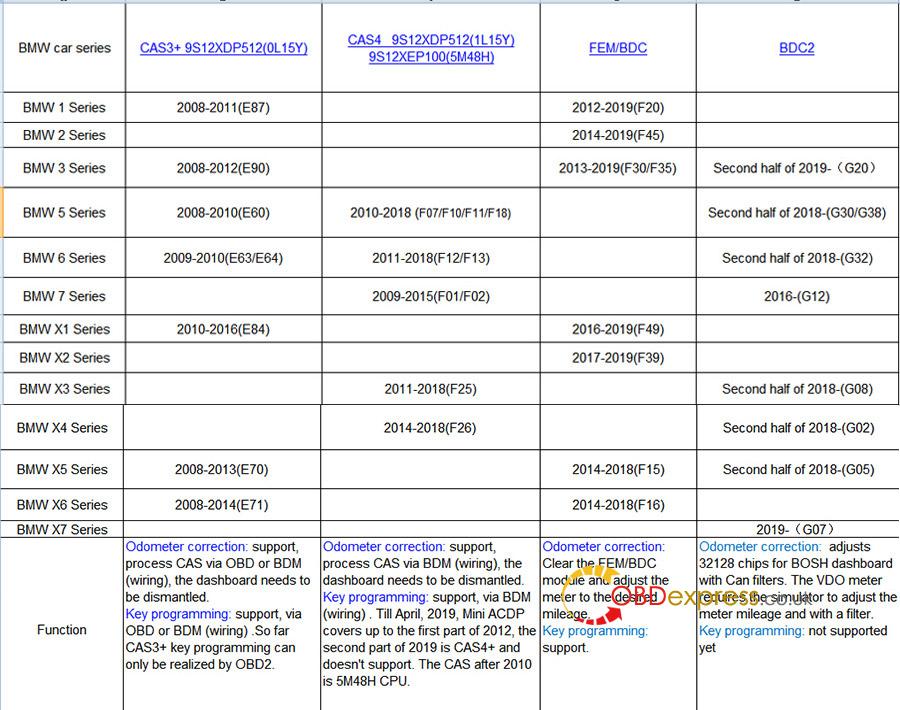
توجه: پس از 2013 سال، یک بخشی از CAS3 + شروع به استفاده از CPU 0M23S
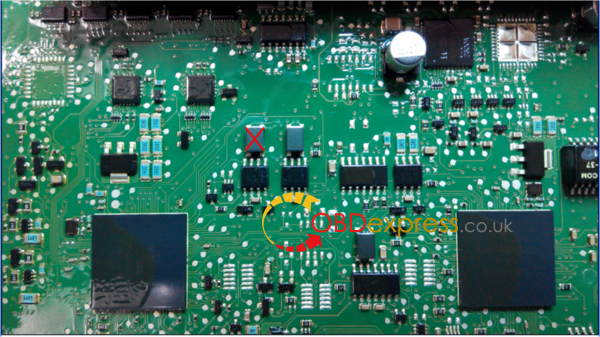
توجه: پس ماژول دور FEM در دسترس است با دو نسخه است، X5 جدیدترین نسخه است، فیلتر می شده است در پشت داشبورد متصل است، Yanhua شرکت هیچ نمودار سیم کشی در حال حاضر.
منبع بسته Yanhua کوتاه ACDP BMW:
http://www.obdexpress.co.uk/wholesale/yanhua-mini-acdp-progarmming-master-bmw.html
http://blog.obdexpress.co.uk/2019/04/03/yanhua-mini-acdp-bmw-cas1-cas4-fem-bdc-bdc2-coverage/


تایید شد: Yanhua کوتاه ACDP به محدود در بیش از یک تلفن همراه اجازه، نه تنها یک تلفن. اما تنها در یک تلفن همراه در همان زمان، اگر شما می خواهید به محدود یکی دیگر تلفن همراه، این یکی سابق نیاز به بی بند و بار.
شما می توانید تلفن همراه خود را به بی بند و بار توسط خودتان استفاده کنید، و یا شما می توانید "تنظیم مجدد" را فشار دهید در Yanhua کوتاه ACDP به بی بند و بار فشار دهید.
تلفن همراه مم به Yanhua کوتاه ACDP روش:
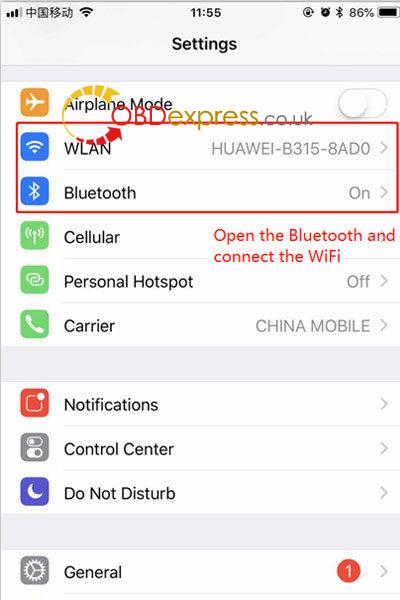
-> باز کردن بلوتوث و اتصال WI-FI
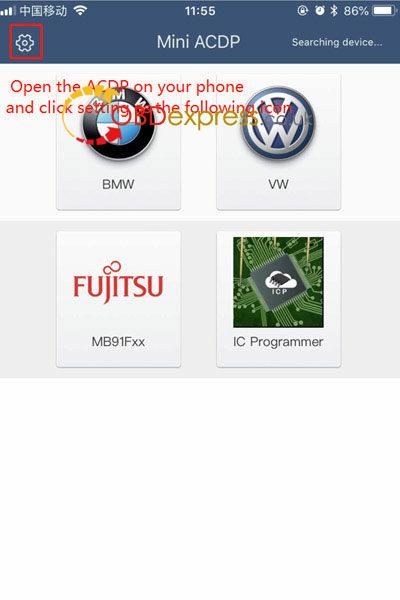
-> باز ACDP بر روی گوشی شما و تنظیمات به عنوان آی زیر کلیک کنید

-> کلیک کنید "استفاده از تنظیمات اولیه"
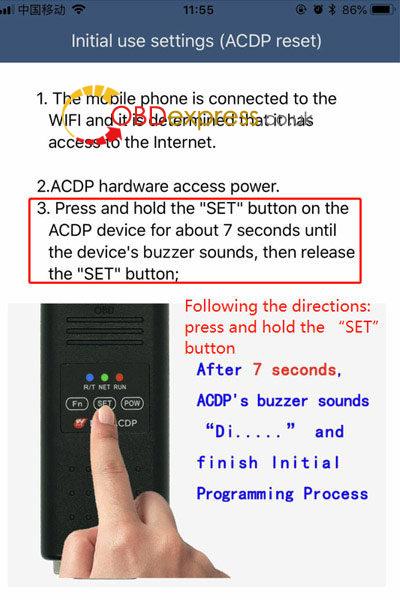
-> پس از جهت:
را فشار داده و "SET" را فشار دهید و نگه دارید، پس از 7 ثانیه، زنگ اخبار ACDP را برای تلفن های موبایل "دی ~ ~ ~" و پایان فرآیند برنامه نویسی اولیه
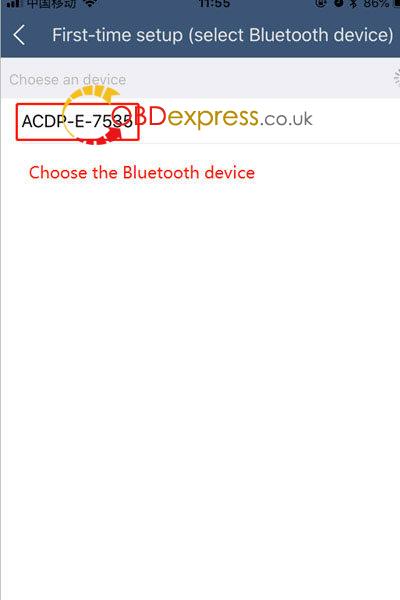
-> را انتخاب کنید دستگاه بلوتوث
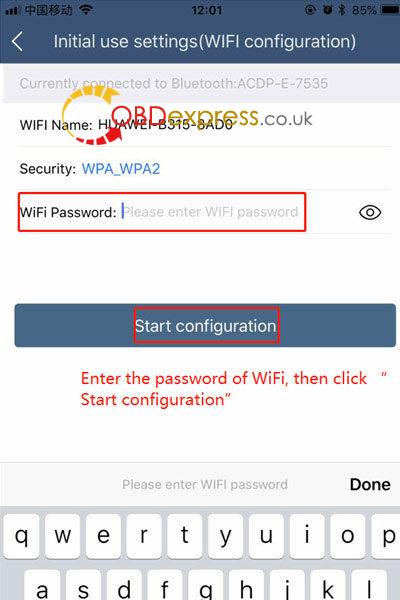
-> رمز عبور از WI-FI را وارد کنید، تنظیمات شروع کلیک
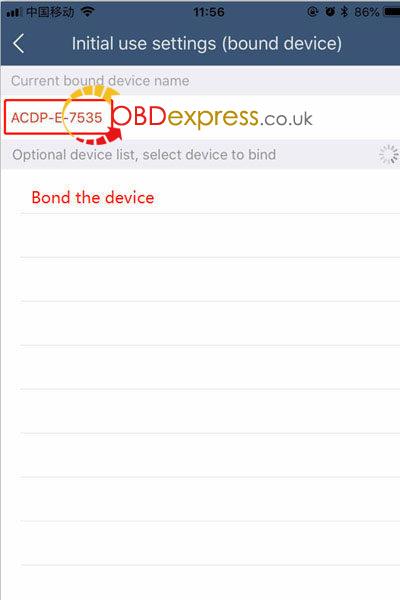
-> باند دستگاه
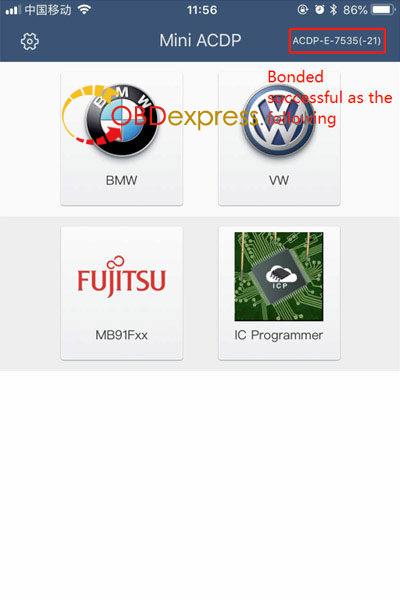
-> انجام شد!
پشتیبانی فنی Yanhua کوتاه ACDP است ارائه www.obdexpress.co.uk
http://blog.obdexpress.co.uk/2019/05/06/bound-yanhua-mini-acdp-in-another-phone/
Hello Foxwell,
I am interested in an ODB2 scanner for use with my 2007 Toyota Highlander
and 2009 Lexus RX350. I would like bidirectional capability to bleed my ABS
brake system on the Toyota and Lexus, also I would like to be able to read
transmission fluid temperature on the Toyota or Lexus.
I am looking for the most cost-effective choice that will fulfill the above
requirements. The NT650 looks like a good choice, but you may have a better
recommendation.
Thank you.
foxwelltool.com tech support reply:
Foxwell NT644 PRO has the capabilities that you want.
Part 1: Foxwell NT644 PRO Toyota Function list:


Part 2: Foxwell NT644 PRO Lexus Function list:


درباره این سایت